A septic system is not something you want guessed at. If you are building a home or replacing a failed setup, understanding the residential septic installation process can save you from bad drainage, permit delays, and expensive rework later.
For most property owners, the big question is simple: what actually happens between the first site visit and a working system in the ground? The answer depends on your soil, your lot, local code, and the size of the home. But the general process follows a clear path, and every step matters if you want the system to last.
What the residential septic installation process starts with
The first step is evaluating the property. Before any tank is delivered or any trench is dug, the installer needs to know whether the land can support a septic system and what type it can handle. That usually means a site visit, a soil evaluation, and a percolation test or similar approval process required by the local health department.
This part is not paperwork for the sake of paperwork. Soil conditions control how wastewater leaves the tank and moves through the drain field. If the soil drains too slowly, effluent can back up. If it drains too fast, wastewater may not get proper treatment before reaching groundwater. Rocky ground, steep grades, high water tables, and small lot sizes can all change the design.
The number of bedrooms in the house also matters. Septic systems are usually sized by expected wastewater use, and bedroom count is a common standard for that. A three-bedroom home needs a different design than a one-bedroom cabin or a larger family house.
Permits, design, and system sizing
Once the site is approved, the next stage is system design and permitting. This is where the installer or designer determines tank capacity, drain field layout, pipe runs, setbacks, and any special equipment the job may require.
A basic gravity-fed system is usually the most straightforward and cost-effective option, but not every property can use one. If the lot has poor slope, limited space, or difficult soil, a pressure distribution system, pump tank, or alternative treatment setup may be necessary. That adds complexity and cost, but sometimes it is the only code-compliant solution.
Permits must be in place before installation starts. In Tennessee, local and state requirements can affect setbacks from wells, property lines, streams, foundations, and driveways. If the approved plan says the tank and field go in a specific location, that is not something you want changed casually once equipment arrives on site.
Marking the layout and preparing the site
After permits are approved, the work area gets laid out. The tank location, sewer line path, and drain field footprint are marked before excavation begins. Utility lines also need to be located. Hitting a buried line creates a dangerous and costly problem fast.
Site preparation may include clearing brush, removing obstacles, and making sure heavy equipment can access the work area without tearing up more of the property than necessary. On some lots, access is easy. On others, fences, trees, soft ground, or tight spacing between structures make the job more difficult.
This is one of those parts of the process that homeowners often underestimate. The septic system itself may fit the property, but the crew still needs room to dig, set the tank, install pipe, and grade the field correctly. Good planning here prevents a lot of headaches later.
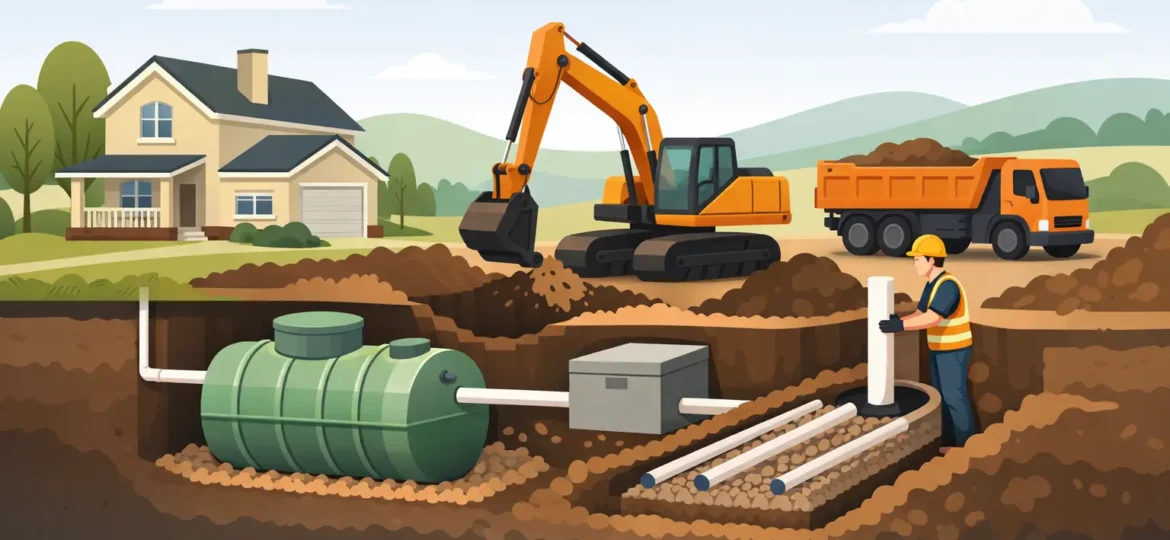
Tank excavation and placement
Once the site is ready, excavation begins for the septic tank. The hole has to be sized and graded correctly so the tank sits level and at the proper depth. If the tank is off level, the system will not perform the way it should.
Most residential systems use either concrete, fiberglass, or polyethylene tanks. Each has advantages. Concrete is durable and common, but it is heavy and requires solid access for delivery and placement. Fiberglass and poly tanks are lighter, which can help on certain sites, but soil conditions and local preferences often influence the final choice.
After the tank is lowered into place, the inlet and outlet connections are aligned with the house sewer line and the line leading to the drain field or dosing system. Installers typically check elevations carefully at this stage. Wastewater needs to flow the way the design intended. Too much slope or too little can both create trouble.
Before the tank is backfilled, components such as tees, risers, lids, and filters may be installed or checked. Risers are especially helpful because they bring access points closer to the surface, making future pumping and maintenance easier.
Drain field installation
The drain field is where a lot of the real treatment happens, so this part of the residential septic installation process deserves attention. Once wastewater leaves the tank, it flows into trenches or beds designed to distribute effluent into the soil at a controlled rate.
The crew excavates the trenches according to the approved design. Then they install the distribution pipes, chambers, or gravel-and-pipe setup required for the system. The spacing, depth, and level of those lines matter. A drain field that is uneven or rushed can fail long before it should.
Some properties call for a conventional drain field. Others need an elevated system, low-pressure pipes, or another engineered layout because of soil limitations or water table concerns. That is why one septic installation can be fairly simple while another on a nearby property is much more involved.
Once the field materials are in place, the trenches are covered carefully. Heavy equipment should not compact the area more than necessary. Over-compaction can reduce the soil’s ability to absorb and treat wastewater properly.
Connecting the house sewer line and any pumps
With the tank and field in place, the next step is connecting the system from the house to the tank and from the tank to the field. If the property can rely on gravity, that keeps things simpler. If it cannot, a pump system may be installed to move effluent where it needs to go.
Pump-assisted systems are common on challenging lots, but they introduce mechanical parts that will need maintenance down the road. That does not make them bad systems. It just means the owner should understand there is more to service than with a basic gravity setup.
At this stage, installers also verify proper slope, watertight connections, and venting as required. This is not the place for shortcuts. Small installation errors can turn into sewage odors, backups, wet spots in the yard, or expensive repairs.
Inspection, testing, and backfill
Before the job is finished, the system typically needs inspection and approval. Local requirements vary, but the installer may need to leave parts of the system exposed so the inspector can verify the tank, piping, and drain field were installed according to plan.
Testing may include checking for leaks, confirming elevations, and making sure pumps or controls operate correctly. Once the inspection is passed, the system is backfilled and the site is graded.
Final grading matters more than people think. Water should drain away from the septic area, not collect over the tank or saturate the field. Poor surface drainage can shorten the life of the system even if the underground work was done right.
What can affect cost and timeline
Homeowners usually want one clean number and one clean deadline. Sometimes that is possible. Sometimes the site says otherwise.
A straightforward installation on an accessible lot can move fairly quickly once approvals are in hand. But rock excavation, wet weather, permit delays, poor soil, limited access, or the need for pumps and engineered components can all stretch the timeline and raise the price.
Replacement jobs can also be trickier than new construction. If a failed system is being removed or abandoned, there may be extra work tied to locating old components, protecting nearby utilities, or finding space for a new compliant drain field.
That is why upfront evaluation matters. A contractor who understands septic work should be honest about what the site allows, what the code requires, and what could change once digging starts.
What homeowners should do after installation
A new septic system is not maintenance-free. It is just starting its service life.
After installation, protect the drain field from traffic, avoid planting deep-rooted trees nearby, and keep roof drains and surface runoff away from the area. Regular pumping also matters. A brand-new tank still needs routine service based on household use, tank size, and what goes down the drains.
It also helps to know what not to flush or pour into the system. Grease, wipes, harsh chemicals, and excessive solids can shorten the life of even a well-installed setup. Good installation gives the system a strong start. Good use keeps it working.
For property owners in the Chattanooga area, this is where experienced local septic contractors make a real difference. A company like Chatta-Rooter Plumbing knows the ground conditions, permitting realities, and installation details that can make or break a septic job.
If you are planning a new system, ask direct questions and expect straight answers. The right contractor should be able to explain the layout, the timeline, the likely cost factors, and any site limitations without dancing around them. A septic system is buried out of sight, but the quality of the work shows up for years. Get it installed right, and you give your property one less thing to worry about.